Building a retaining wall might seem like just another home improvement project, but it’s so much more than that. Think of it as the foundation of your landscape—literally and figuratively. A well-constructed retaining wall can tackle erosion issues, create usable land, and enhance the beauty of your yard all at once. However, before you grab your shovel and materials, it’s important to know what you’re getting into. From careful planning and material selection to understanding local regulations, there are many things to consider.
Overview of the Retaining Wall Installation Process
The installation process for a retaining wall begins long before earth meets stone. It starts with careful planning and understanding the unique conditions of your landscape. For instance, evaluating the slope of your land and the type of soil present is crucial. Sandy soils, which drain well, may require different considerations than clay-heavy soils that retain moisture. Knowing this can greatly influence your choice of materials and wall design.
Material selection plays a vital role in ensuring both functionality and aesthetics. The blocks you choose should not only be robust enough to withstand lateral pressures from the soil but also visually appealing to blend seamlessly into your landscape. For example, stackable concrete blocks often come with engineered grooves that interlock, providing stability while allowing for creative design options. Just as importantly, don’t forget about drainage; incorporate drainage pipes helps prevent water buildup behind the wall, which could lead to pressure issues or even wall failure.
Once you’ve established your material choices and site specifics, you’ll move into the physical work of installation.
The first practical step involves marking out where your wall will stand. Using stakes and string, outline the precise dimensions to guide your digging and laying processes. A trench typically needs to be excavated before setting the foundation—think of it as giving your wall a solid footing. This trench should be approximately twice the width of the stones you’re using, enabling a firm base when you start stacking layers.
As per building best practices, ensure this trench is at least 6–12 inches deep to accommodate a stable gravel layer that promotes drainage and prevents frost heave in colder climates.
Once you’ve prepared the foundation with gravel, it’s time to lay down the first course of blocks or stones. Make sure they’re level—this is critical because an uneven base can lead to complications later on. Picture it this way: if you were baking a cake, starting with a lopsided layer wouldn’t yield good results; similarly, an unsteady base affects your wall’s strength and durability.
After ensuring that your foundational layer is correct and secure, attention turns toward ongoing considerations that will impact your wall’s longevity.
Backfilling is another essential aspect of reinforcing a retaining wall’s strength. By filling the space behind the wall with gravel or soil, you create additional support against earth pressure from behind. However, it’s not enough just to dump materials; compacting them in layers adds stability that prevents erosion over time. If this step is overlooked, you’re risking future shifting or settling. That could compromise your beautiful hard work.
Regular maintenance is non-negotiable—an annual inspection can catch potential issues like cracks or bulging early on, saving you significant repair costs later. Building a retaining wall requires forethought and precision; make sure you’re equipped with knowledge about both the installation process and upkeep practices before diving in.
Having established these foundational steps and considerations, it becomes essential to transition towards how best to visualize and plan for your retaining wall’s design elements to enhance its functionality and visual appeal.
Design and Planning Stage
Designing and planning a retaining wall is crucial for ensuring its longevity and effectiveness. How many choices affect the wall’s aesthetics and function may surprise you.
Before you start stacking materials, consider your end goals. Whether you envision a stunning outdoor feature or need a practical solution to hold back soil, defining the purpose of your wall is the first step. Imagine standing in your yard, envisioning how those blocks will create separation, retain soil, or level areas—all tailored to both serve and beautify your space.
Determining Wall Purpose and Location
The first step is to determine the wall’s purpose—whether it’s for aesthetic appeal, soil retention, or creating level areas in a sloped yard. Consider this: if you’re building a wall purely for decoration, the materials and design may differ greatly from one intended for serious erosion control. Once you’ve identified its purpose, map out the location carefully. Pay attention to natural drainage patterns to avoid water buildup behind the wall, which can seriously compromise its stability.
Compliance with Local Building Codes
Next on our list is an often overlooked aspect: compliance with local building codes and regulations. Many municipalities impose restrictions on wall height and require permits for walls exceeding a certain height—typically four feet. It’s essential to check these regulations before proceeding with installation because the last thing you want is to finish your beautiful wall only to find you need to take it down due to legal restrictions.
Professional Consultation
When you engage with professionals familiar with local practices, you not only learn more about appropriate materials but also about the best construction techniques that ensure structural stability. Engaging experts can be beneficial not only for their knowledge but also for the peace of mind they provide as your project progresses.
Essential Materials and Tools
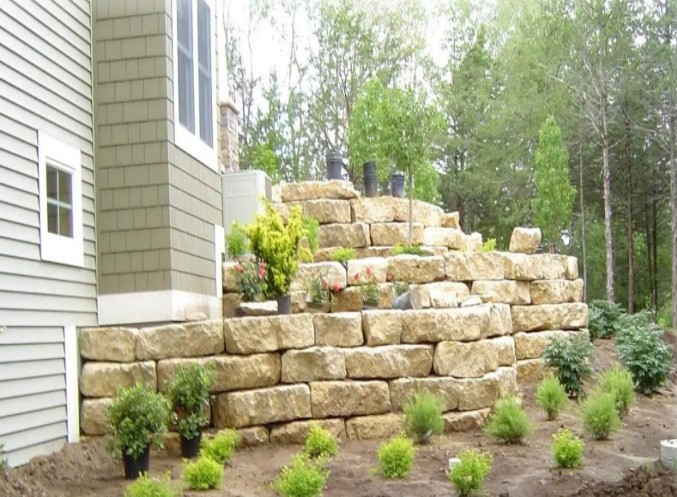
When it comes to constructing a retaining wall, the choice of materials plays a pivotal role in its longevity and visual impact. One of the most popular options is concrete blocks, designed for strength and stability. Known for their versatility, these blocks often feature engineered grooves and lips that help them interlock securely, providing extra resilience against lateral earth pressure. This combination of function and ease of installation makes concrete blocks a go-to choice for many homeowners.
Cost Comparison Table
| Material | Pros | Cons |
Approximate Cost Per Unit |
| Concrete Blocks | Durable, Versatile | Can be expensive | $1.50 – $3.00 per block |
| Natural Stone | Aesthetic appeal, natural look | Labor-intensive, Expensive | Varies widely; generally $10+ per sq ft |
| Treated Timbers | Economical, Easy to work with | Not as durable; Susceptible to rot | $2.00 – $4.00 per foot |
With your materials sorted out, it’s time to turn our attention to the essential tools needed for this project.
The installation process requires key tools to ensure everything goes smoothly. For instance, you’ll need shovels and spades for digging trenches; they’re foundational in preparing your site properly. Make sure to invest in sturdy options that can handle tough soil conditions without bending or breaking. A reliable level is equally important; it allows you to achieve evenness throughout your wall’s height, ensuring structural integrity once completed. After all, a crooked wall is not only unsightly but can lead to potential failure over time.
To tactically place your blocks without damaging them, a rubber mallet comes in handy; it provides the gentle force needed to align everything correctly without marring the surfaces of your blocks. Additionally, you’ll need gravel for both the base layer and backfill. This material aids in drainage behind your retaining wall, preventing water accumulation that could compromise its strength.
Step-by-Step Installation Guide
To begin, site preparation is crucial for achieving a stable and durable retaining wall. Start by clearly marking out the path of your wall with wooden stakes and string. This will give you a clear visual and help maintain straight lines as you construct. Once marked, it’s time to dig a trench that’s both wide and deep enough to support your wall’s foundation, typically around eight inches deep. The accuracy of this step will significantly impact how well your wall performs over time.
After you’ve prepped the site, focus on constructing a solid base layer. Fill your trench with gravel, compacting it thoroughly to form a stable foundation. This layer is crucial as it facilitates drainage and guards against future wall settling, which could potentially cause structural problems in the future. Think of this layer as the unsung hero of your project—it does a lot of heavy lifting even if you don’t see it once your wall is built.
Moving on to the first course of blocks or stones, this step is where precision is key. Lay down the first layer and align it, ensuring each block or stone sits snugly against its neighbor. This foundational layer isn’t just about aesthetics; it plays a critical role in ensuring the stability of the entire structure. If this first course isn’t well-placed, alignment and building difficulties may arise in subsequent layers.
Once your first course is secure, it’s time to continue stacking those blocks above it.
In building subsequent layers, remember to stagger joints like traditional brickwork. This technique enhances strength and stability significantly. Use your level frequently—after all, you want each layer to be even and steady—and don’t hesitate to use a mallet to tap any stubborn blocks into place. A little extra effort here pays off immensely; an uneven wall can lead to future complications such as bulging or collapsing.
A crucial aspect of building a reliable retaining wall lies in backfilling as you go along. As you increase the height of your wall, backfill behind it with gravel. This promotes effective drainage while preventing water from accumulating and causing pressure behind your wall—a leading cause of walls failing prematurely. By ensuring proper drainage during installation, you significantly extend the life of your wall.
With the main structure taking shape, you’ve nearly wrapped up this project!
Finally, lay the top blocks on the wall’s top course for those finishing touches. Secure these with construction adhesive if necessary according to manufacturer guidelines; they provide both stability and an aesthetically pleasing finish. Don’t forget to backfill the remaining area with soil after securing these caps to seamlessly blend your new retaining wall into its surroundings—this adds to its overall appearance but also helps with erosion control.
Cost Considerations for Homeowners
When embarking on your retaining wall project, it’s crucial to have a clear picture of the financial aspects involved. The choices you make around materials and whether to hire professionals or tackle the work yourself will significantly impact your overall budget. Understanding these elements can help you avoid surprises down the line.
Materials Cost
As you evaluate your options, remember that the cost of materials is often the largest portion of the expense. For instance:
- Concrete blocks generally range from $12 to $30 per square foot, offering a balance between affordability and durability.
- Natural stone can give you an aesthetically pleasing finish but comes with a higher price tag of $25 to $50 per square foot.
- Treated timber usually runs about $15 per square foot but may not provide the same longevity as concrete or stone.
While materials form the bulk of your expenses, there are multiple other costs that may arise during installation that are equally important to consider.
- Labor: Whether you’re hiring professionals or engaging friends for a DIY project, labor costs can add up quickly. Expect to pay around $50 to $100 per hour for skilled labor.
- Permits: Depending on where you live, local regulations might require permits for construction. These can vary from $50 to $200, so it’s wise to check with your local municipality before starting.
- Additional Features: If your retaining wall design includes drainage systems, additional landscaping, or decorative features, factor those costs in as well.
With this understanding of potential costs, homeowners can effectively plan their budgets. There are also key aspects related to upkeep that will ensure the longevity and functionality of your structure.
Maintaining Your Retaining Wall
Regular maintenance is essential for maintaining the functionality and beauty of your retaining wall. Natural elements can wear down even the sturdiest walls over time.
Conducting regular inspections allows you to spot potential issues before they escalate into costly repairs. This proactive approach can be as simple as walking up to your wall every few months and looking closely for signs of distress like cracks or bulging areas. Small cracks might be easy to fix with some sealant, but if ignored, they can expand and compromise the whole structure.
Inspection and Cleaning
During each inspection, note how the wall responds to seasonal changes. Applying a mild detergent and using a brush can help keep the surface clean, removing dirt and preventing mold growth that thrives in damp environments. A dirty wall not only looks unappealing but may also trap moisture that can erode its integrity over time. Cleaning should ideally occur twice a year, aligning it with the changing seasons when you’re likely to notice more debris.
Drainage Management
It can be tempting to overlook drainage systems, but these are vital for preventing water buildup behind your retaining wall. Proper drainage protects your wall from hydrostatic pressure, which occurs when water accumulates in the soil behind it. Periodically check any weep holes or drainage pipes to ensure they are clear of debris, allowing water to flow freely. A blocked drainage system will shorten the lifespan of your wall and could lead to costly repairs down the road.
Vegetation Control
When planning landscaping, consider that not every plant suits proximity to a retaining wall. Opt for smaller plants or decorative grasses rather than trees and shrubs with aggressive root systems that could exert pressure against your wall. It’s also wise to periodically trim back overhanging branches or roots that threaten to encroach on the structural integrity of your wall because roots can burrow into and disrupt its foundation over time. Ensure you prevent any unwanted intrusions! Maintaining your retaining wall diligently not only protects its function but also enhances its visual appeal, making it a wise investment that endures over time.
Why Choose Village Green Landscapes?
At Village Green Landscapes, we understand that every property is unique. That’s why we offer customized retaining wall designs that complement your landscape and improve its overall functionality. From tiered gardens to level terraces, our walls are built to withstand harsh weather conditions while providing long-lasting stability and curb appeal. We work with a wide variety of materials, including natural stone, concrete blocks, and decorative pavers, ensuring your retaining wall blends seamlessly with your outdoor aesthetics. Contact us today!